Source instrument windows
Please see this overview page first to understand some basic principles about using scripting functions in SIGVIEW.
Script instrument source window provides the possibility to insert instrument values into SIGVIEW from the outside, for example from external services, APIs or hardware devices. Unlike regular script instrument windows, instrument source windows have no parent windows - instead, they generate their values autonomously.
How to create Script Instrument Source Window
Select Scripts/Instrument source window main menu option. A new instrument window will open. At the same time a source code editor will open, opening script template and allowing you to edit a script to define the content of your window. Until you write and save your script, window will show the default value of 0.
The script template will already contain some content: In the upper part, you will find some help text and in the lower part a short reference of all important types you can use. The important part is in the middle - those are the update(...) and getUpdateIntervalMSec() functions:
function update( output_instrument::SigviewInstrumentWindow )
#write your code here
return false
end
function getUpdateIntervalMSec( )
return 0
end
The purpose of update(...) function is to collect the instrument value from the external source and to insert it into SIGVIEW. If it was successful, i.e. a new value has been provided, the function should return true. If there is no new value, the function should return false.
For detailed description of SigviewInstrumentWindow struct, see Data types chapter.
The second function, getUpdateIntervalMSec, defines if update(...) should be called automatically in specified time interval (in milliseconds). If you return 0 in this function (default), update(...) function will not be called automatically. If you return a value >0, your update function will be called in that time intervals. This is useful for polling external services or devices for new values.
Let's show how this works on an example. We will simply generate a random instrument value and update it every second:
function update( output_instrument::SigviewInstrumentWindow )
output_instrument.value = rand() * 100.0
output_instrument.unit = "units"
return true
end
function getUpdateIntervalMSec( )
return 1000
end
As soon as you save the script from your editor, SIGVIEW will detect that the script has changed, the script will be executed and the result will be displayed in a SIGVIEW instrument window. You can keep editing the script - each time you save it, SIGVIEW will execute it again and update the displayed value.
If your update(...) script returns false, the instrument will keep showing the last valid value.
You can explicitly execute the script again by selecting Execute script... context menu option. In the above example with random values, you would get a new random value each time you do it.
If you additionally change the return value of the getUpdateIntervalMSec function to 1000ms, your random value will update once per second.
How would you track values over time? You can do it by defining a global variable outside your functions:
call_count = 0
function update( output_instrument::SigviewInstrumentWindow )
global call_count += 1
output_instrument.value = sin(call_count * 0.1) * 50.0
output_instrument.unit = "mV"
return true
end
function getUpdateIntervalMSec( )
return 100
end
Note that the global variable call_count will have a different instance/scope for each window where it is used - it is not really a global variable but only global for your window.
Setting the instrument name
You can optionally define a toolName() function in your script to set the name displayed in the title bar of the instrument window. For example:
function toolName()
return "Random sensor"
end
Handling errors
If you make an error in your script, for example syntax error, using unknown function or variable etc., you will see the corresponding Julia error message in your SIGVIEW window in its upper left corner:
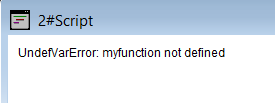
You can copy the displayed error text to the clipboard by using Copy text output to clipboard context menu option.
Further reading
See scripting examples in this help and Advanced topics chapter for some additional advanced functions you can implement in your script.