Signal windows
Please see this overview page first to understand some basic principles about using scripting functions in SIGVIEW.
Script signal window processes input from one or more signal or instrument windows (parent windows) and produces the content of a new signal windows as a result. For example, you would use it if you want to implement your own signal transformation or some new analysis method.
How to create Script Signal Window
1.If your new window should have only one source/parent window, then just click on the parent window and select Scripts/Signal window main menu option.
2.If your new window should have multiple source/parent windows, you can create it from a Control Window. Just select all parent windows in the Control Window and select New script signal window... menu option from the context menu of the Control Window.
In both cases, a new window will open. At the same time a source code editor will open, opening script template and allowing you to edit a script to define the content of your window. Until you write and save your script, window will be blank, showing only "Not enough data to show the signal" message.
The script template will already contain some content: In the upper part, you will find some help text and in the lower part you a short reference of all important types you can use. The important part is in the middle - it is the process(...) function:
function process( input_windows :: Array{SigviewWindow}, output_signal:: SigviewSignalWindow )
#write your code here
return false
end
This is the only function you have to fill with content.
•input_windows is an array containing all parent/source windows of your new window. See this chapter for a reference about the struct types which can be included in this array.
•output_signal is the content of your new window. You have to fill it with some data in this function.
•The function should return true if the content of output_signal is valid and should be displayed, false otherwise
For detailed description of SigviewWindow and SigviewSignalWindow struct types, see Data types chapter.
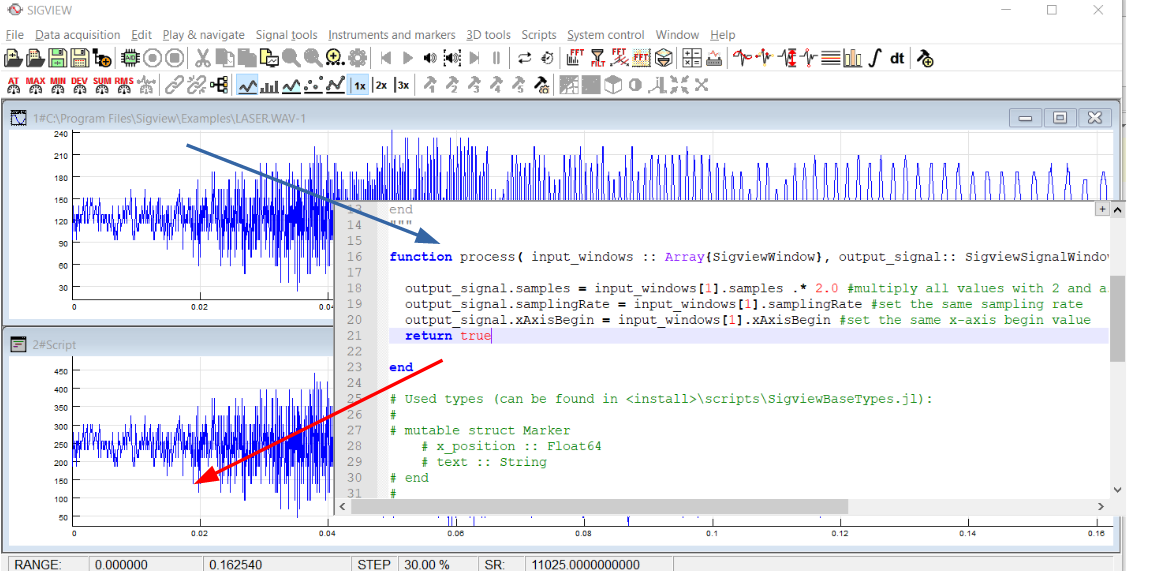
Let's show how this works on an example. If we would like to create a window which multiplies the values of its (first) parent window with 2.0, the process function would look like this:
function process( input_windows :: Array{SigviewWindow}, output_signal:: SigviewSignalWindow )
output_signal.samples = input_windows[1].samples .* 2.0 #multiply all values with 2 and assign to output
output_signal.samplingRate = input_windows[1].samplingRate #set the same sampling rate
output_signal.xAxisBegin = input_windows[1].xAxisBegin #set the same x-axis begin value
return true
end
Only the first two lines, setting sample array and sampling rate are mandatory to create a signal which can be displayed. For all other members of the output_window, there is a default value.
As soon as you save the script from your editor, SIGVIEW will detect that the script has changed, the script will be executed and the result will be displayed in a SIGVIEW window. You can keep editing the script - each time you save it, SIGVIEW will execute it again and update the content of a window.
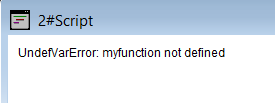
Handling errors and displaying text
If you make an error in your script, for example syntax error, using unknown function or variable etc., you will see the corresponding Julia error message in your SIGVIEW window in its upper left corner:
If you would like to report an error of your own from the script, you can define a corresponding text message to be displayed and return false from the process function. For example, if your script expects to have exactly two parents, you can check it and display appropriate error like this:
if length( input_windows ) != 2
output_signal.textToDisplay = "Error:\nThis script can process only 2 inputs signals"
return false
end
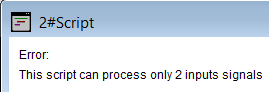
Even if you provide the content of the window, i.e. return true from the process function, you can still use textToDisplay variable to display a text in the result window, for example for debugging purposes.
You can copy the displayed error text to the clipboard by using Copy text output to clipboard context menu option.
Further reading
See scripting examples in this help and this chapter for some additional advanced functions you can implement in your script.