Batch File Processing
A common task in signal analysis is applying the same set of processing steps to multiple signal files - for example, extracting FFT data, calculating RMS values, or generating time-frequency plots. While SIGVIEW has long supported this via its Command-Line Remote Control features, setting up such batch operations manually has typically required advanced knowledge of Windows batch scripting - a barrier for many users.
To simplify this process, SIGVIEW includes a Batch File Script Generator, which allows users to create ready-to-run batch files for automated signal processing - without needing to write any code.
Overview: How Batch Processing Works
The basic idea is to:
•Create a template workspace that defines all your desired analysis steps for a typical input file.
•Use the Batch File Script Generator to specify what results to save and how to process files. As a result, a ready-to-use batch file is created.
•Automatically apply the same analysis to a folder full of similar files by executing the generated batch file from the Windows command line.
Step-by-Step Guide
This would be the procedure for creating a batch file for automated file processing:
1.Create a template/example Workspace: Start by creating template workspace that defines all your desired analysis steps for a typical input file. Make sure that all analysis windows you need are created and all needed results are visible. For example, we will create a Workspace which calculates a spectrum (FFT-Window), a 1/3 Octave plot, Time-FFT plot, and also two instruments calculating RMS of the signal and a maximal frequency position from its spectrum. This workspace will be used as a template analysis which will be applied to all signal files during later automated processing.
SIGVIEW window looks like this in our example:

Please note that we assigned readable names to the windows ("octave-plot", "fft-window" etc) by using "Change window title..." context menu function. It is not mandatory, but it can help finding the right window in complex workspaces.
2.Save the Workspace: Now, save your workspace in a file by using "File/Save Workspace..." menu option. Important note: When prompted “Would you like to save actual signal file names in the Workspace file?”, choose “NO”. This ensures your workspace acts as a template, not tied to a specific file. In our example, the workspace is savedas "c:\tmp\batch test\test.sws". You may now close all SIGVIEW windows.
3.Open the Batch File Script Generator: Go to "File/Batch file processing script generator" menu option to open the dialog which will guide you through the script creation.
4.Load the Template Workspace: In the dialog, load the .sws file you just saved. If the workspace is incompatible (e.g., includes multiple input files or no file-based windows), an error message will explain the issue.
5.Select Output Options: After the Workspace file was loaded successfully, the dialog will display all available windows from your workspace:

By selecting windows in the table in the middle of the dialog, you can decide which results from which window would you like to save for each processed signal file. The available options are:
oSave as WAV file – For time-domain or similar signal data
oSave as ASCII file - For any type of window (including 3D and Instruments)
oSave as Bitmap - For visual output (not supported for Instruments)
You can also define a file name prefix for each window - helpful when organizing outputs.
Additional options:
oEnable “Save bitmap of the SIGVIEW main window as well” if you want a full-screen snapshot for each processed file.
oDecide what happens to input files after processing (e.g., delete them if they are temporary or duplicated elsewhere).
oAnother available option is "Extract all instrument values to CSV file". This option exports the current values of all instruments from the workspace into a semicolon-separated CSV file. If the CSV file already exists, SIGVIEW appends a new line rather than overwriting it. First column will contain the name of the input file. This can be useful to generate structured numeric datasets from large collections of signals - ideal for AI/ML feature extraction, classification workflows, or automated reporting. See the description of the corresponding command-line option "extractvaluestocsv" for details.
In this example, ASCII result file and a Bitmap will be saved for FFT window and 1/3 Octave window. For maximum frequency instrument, only ASCII file with its value will be saved. File name prefix is defined for FFT and 1/3 Octave windows.
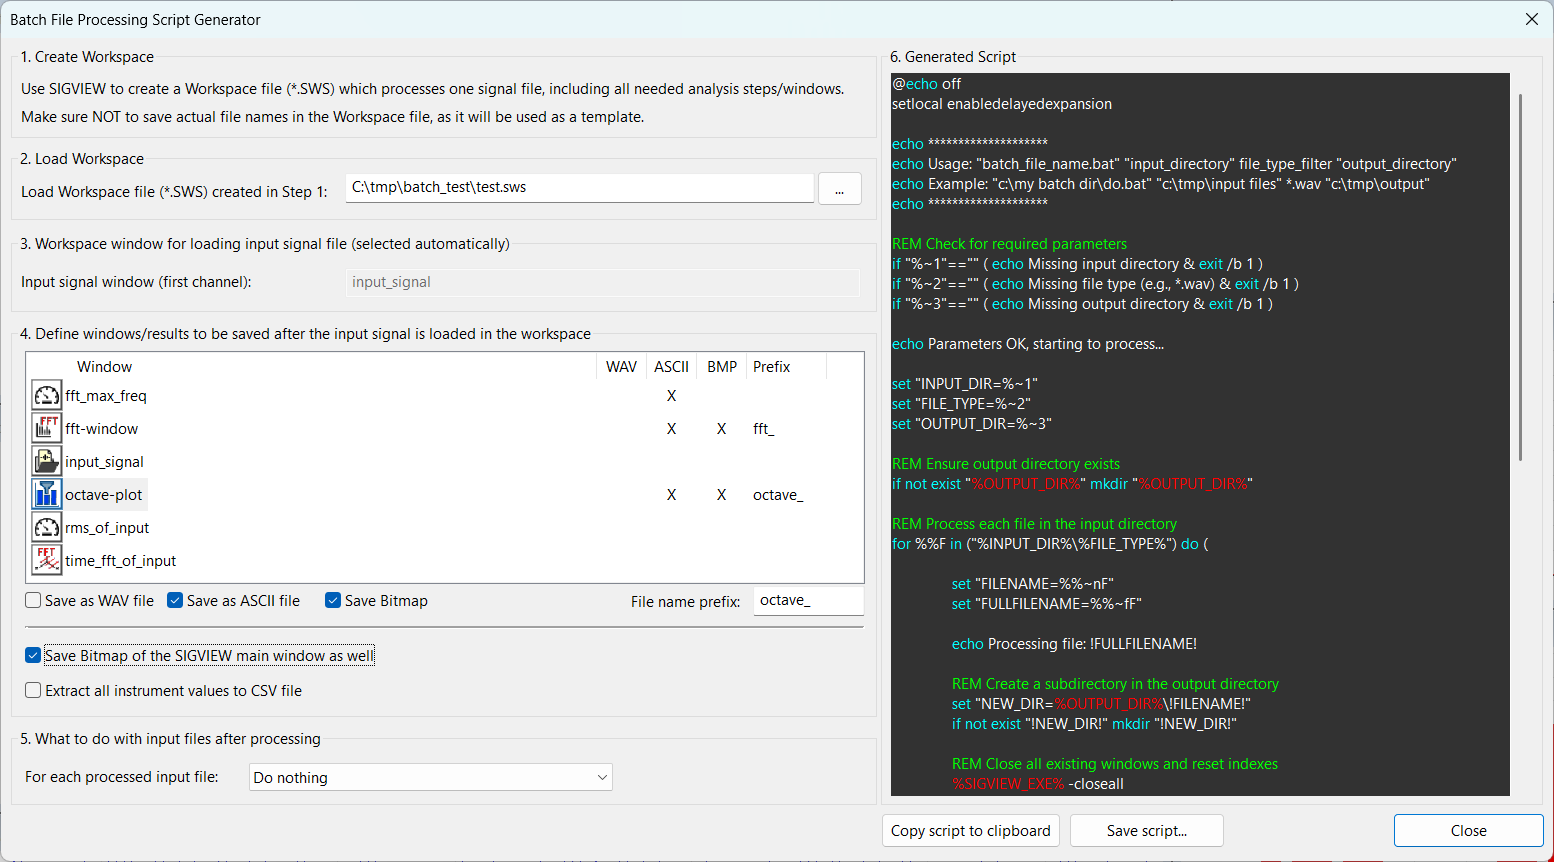
6.On the right side of the dialog, SIGVIEW automatically generates a Windows-compatible batch file based on your settings. When you're ready, save it to disk with a .bat extension.
Example: C:\tmp\batch test\do.bat.
Running generated batch file and collecting results
Prepare your input/output folders:
To execute the batch file and perform the analysis of many files, you need the following information:
•The name of the input directory where your input files are stored ("C:\batch test\input" in this example)
•File type filter for input signal files, for example *.wav in this example
•The name of the output directory where the results will be stored (empty directory, will be created if it does not exist). "C:\batch test\output" in our example.
To run the batch file, open a Windows Command Prompt ("cmd" + Return in Windows search box) and navigate to the directory where you saved the batch file (C:\tmp\batch test).
Now, run the batch file by using the following syntax:

It will process all *.wav files from the input directory and save the results into the output directory. For each input file, a subdirectory of the output directory with the same name as the input file name (without extension) will be created, and all the result files will be stored in it.
In the command-line window, you will see which files are being processed and if the processing is finished.

The content of the input directory in this example was:

And the resulting output directory would look like this:

and each of the new directories in the output directory will contain the following files (as specified by you in the dialog above):

Important note: The .SWS workspace file must remain at the location specified during batch file generation. If moved, open the .bat file in a text editor and manually update the path.
Important note: All files processed in batch mode must be of the fairly similar format to the one used to create the workspace. For example, a workspace based on a single-channel signal cannot be used to process multi-channel files. Incompatible files may result in missing or empty output.